After click "Buy Now", the item are placed in PRIVATE WAREHOUSE.

|
|
Discontinued
Vacuum Tube Radio
by Gakken
$62.59 USD
This item is discontinued and is not expected to come back into stock.
Description
This is an assembly kit of a space exploration vehicle or other non-fictional mechanism.
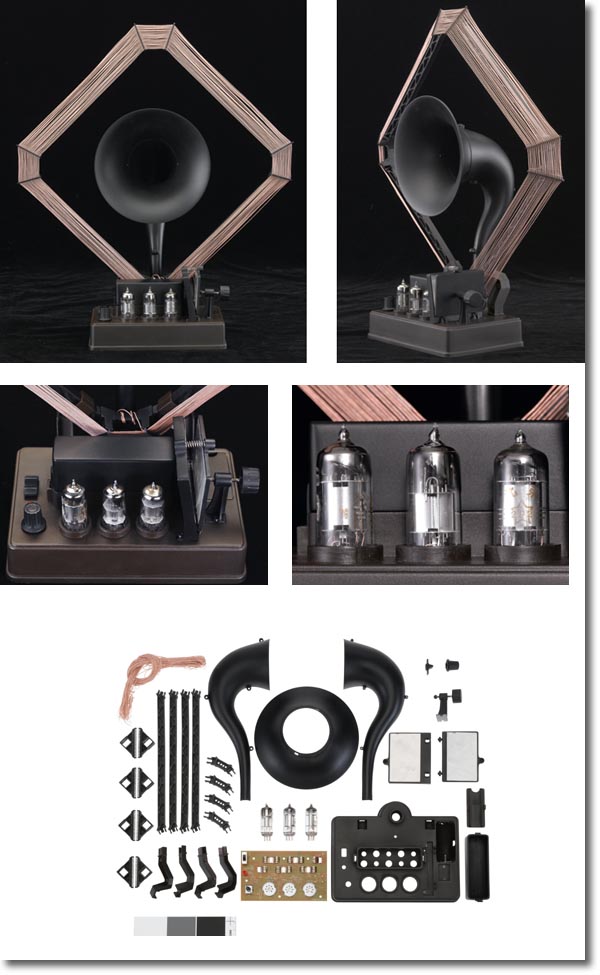
Interestingly, this is a kit that allows you to put together a real, functional, vacuum-tube radio! It takes about two hours to assemble (according to the box) and runs on 5 9V batteries and 1 "C" battery (batteries not included). Instructions are in Japanese but illustrated; if you take care you should be able to get through them without too much trouble. A note on the box points out that the vacuum tubes in this kit are reclaimed, and are about 30 years old; scratches on the surface of the glass are not considered defects.
Notes from Katrina: I put this kit together myself the other night. My Japanese skills are pretty minimal but by going slowly through the parts list and the instructions (which are very well illustrated), I had no problems. The most annoying part was detangling the antenna wire! Important to note: the only tool you'll need is a tiny screwdriver, which is included in the kit; also, there are two lengths of antenna wire included, and they are exactly the length you need to use, so measure carefully and do not cut the wire. The instructions say to leave a 30cm trailing end when you fasten the antenna wires to the Litz antenna frame, and that's exactly what you need to do. The hardest part of building the radio was connecting the wires correctly, but the illustrations in the instructions are very clear on which wires go where. Have fun building your own vacuum tube radio!
One of our loyal HLJ customers uploaded a cool video that he made of how he built the Vacuum Tube Radio and how it operates to YouTube. Big thanks to Tom for the excellent video!
Details
- Code: GAK166609
- JAN Code: 4905426621333
- Release Date: 2006/03/27
- Category: Real Science
- Country of Origin: Japan
- Series: Otona no Kagaku
- Item Type: Real Science Kits
- Manufacturer: Gakken
- Item Size/Weight: 15.8 x 21.3 x 12.1 cm / 750g
- Storage Fee per Month: ¥271 (¥246 base + 10% consumption tax)
All contents © 2024 HobbyLink Japan Ltd. Kurohakama-cho 162-1, Sano, Tochigi 327-0813 JAPAN